Namespace as a Service Portal
This section details the steps used to interact with the Namespace as a Service Portal. In this section you will learn how to gain access as an administrator, request a new namespace be approved and how to gain access to a namespace that has been provisioned.
Cluster Authentication and Access
The same instructions for accessing your clusters works in the NaaS portal.
Administrative Access
There are two sets of administrator roles:
- administrators - Whether external or internal, an administrator is responsible for approving assignment of cluster administrator and for the creation of new namespaces.
- cluster-administrators - Whether external or internal, a cluster-administrator has the Kubernetes
cluster-adminClusterRoleBinding.
If you're using the external management model, these roles are assigned automatically based on your groups in your identity provider and there's no furth action needed. If you're using the internal groups management or hybrid management models there are two ways a user can gain access to these roles. Either via self service or by being assigned by an administrator.
Administrator Self Service Access
If a user wishes to become an adminitrator, first the user must login to the NaaS self service portal:
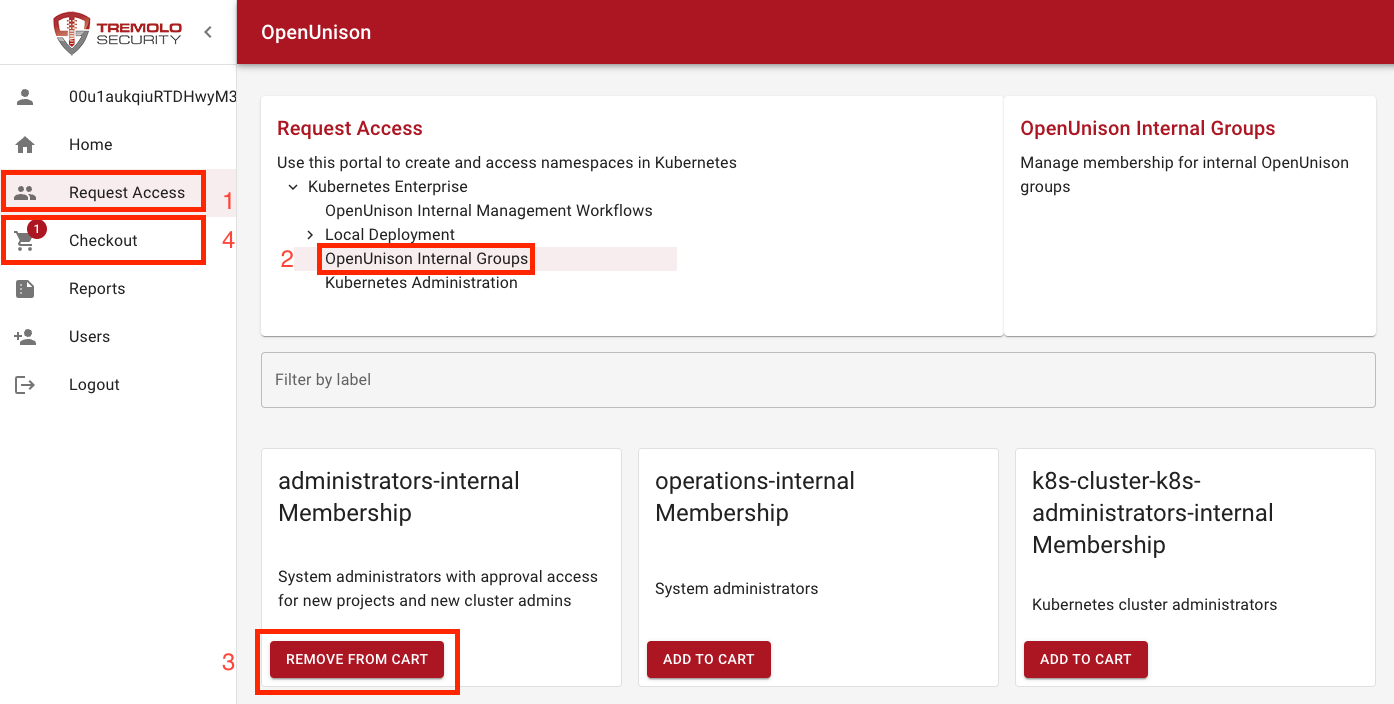
- Click on Request Access
- Choose OpenUnison Internal Groups so that it is now in bold
- Next to
administrators-internal, click Add To Cart - Click on Check Out in the menu bar
At this point the request is in your user's cart and can be checked out:
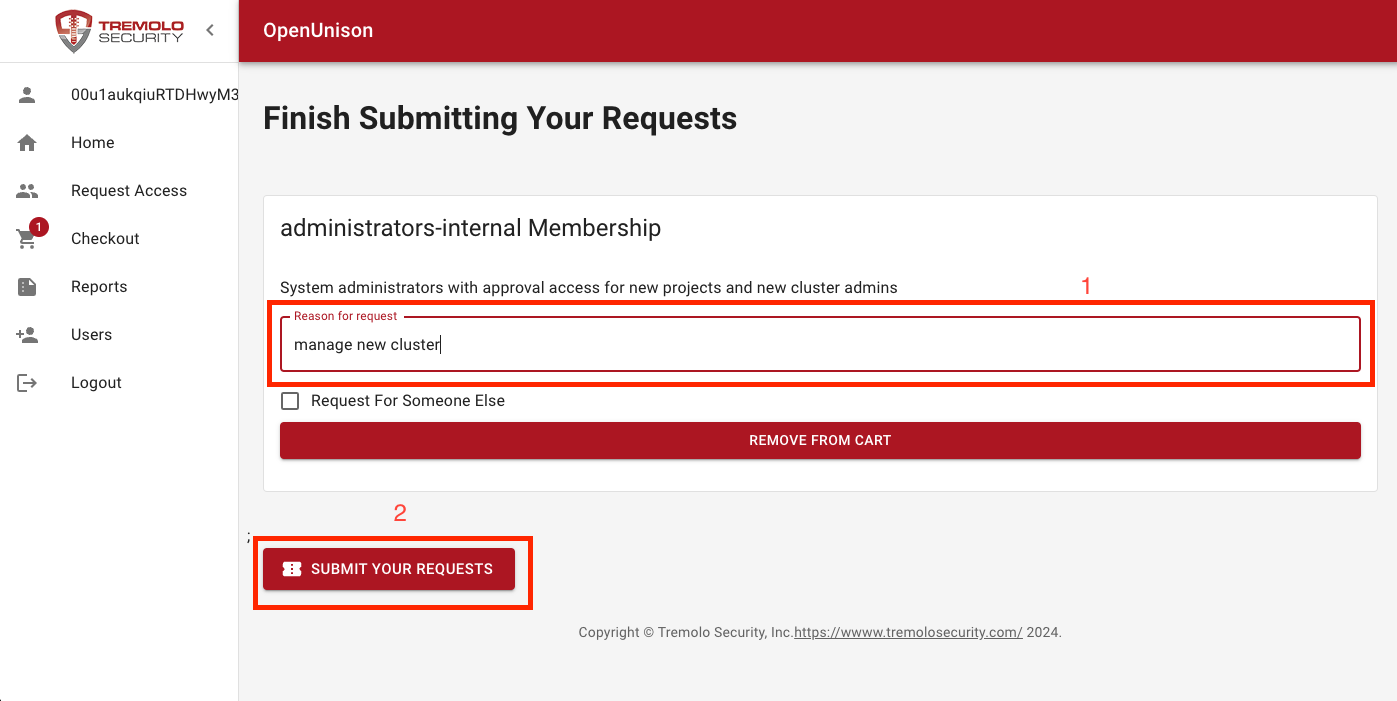
- Provide a reason for why the access to administrator is needed.
- Click Submit Request to complete the request.
A current administrator will need to approve this request. You can see who is able to approve the request by Viewing Reports, namely the My Open Requests report.
Cluster Administrator Access
Cluster administrators have the Kubernetes cluster-admin ClusterRoleBinding. They have the ability to do anything inside of the cluster, but can not approve the creation of new namespaces requested by other users. To request cluster administration access, login to the NaaS Portal:
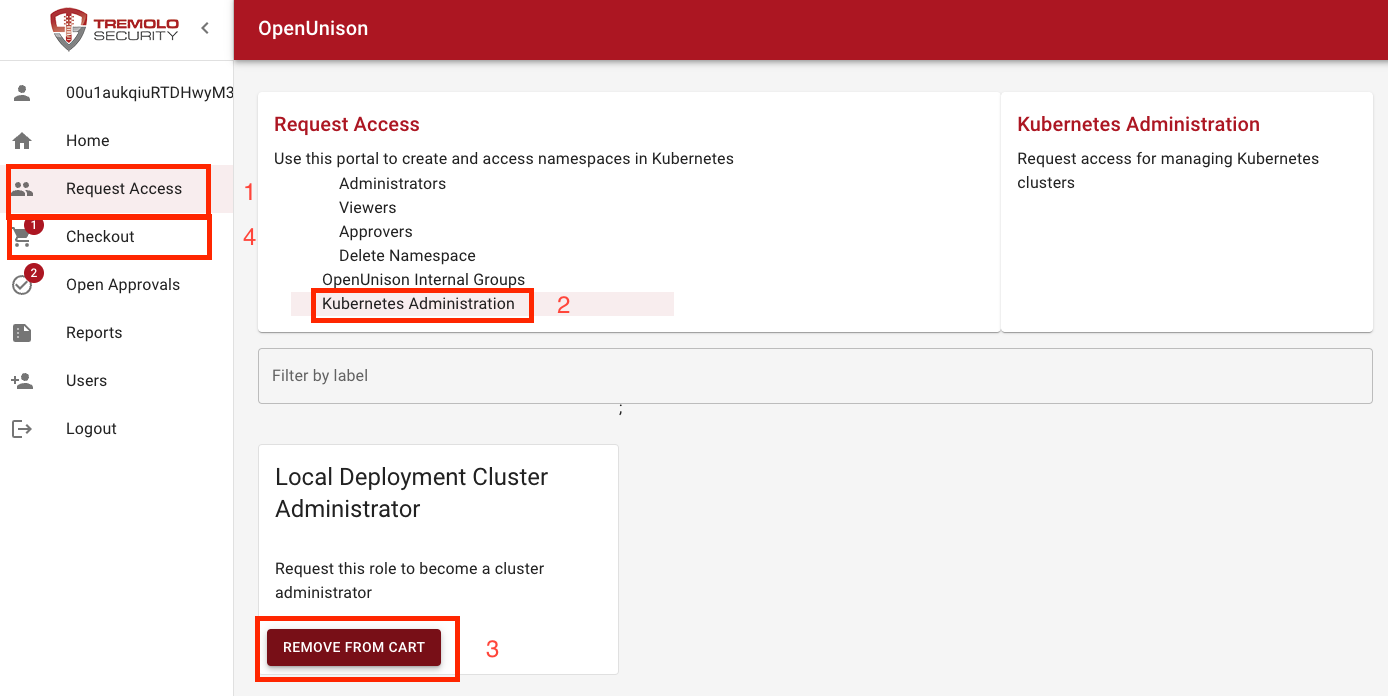
- Click on Request Access
- Choose Kubernetes Administration so that it is now in bold
- Next to
Local Deployment Cluster Administrator, click Add To Cart - Click on Check Out in the menu bar
At this point the request is in your user's cart and can be checked out:
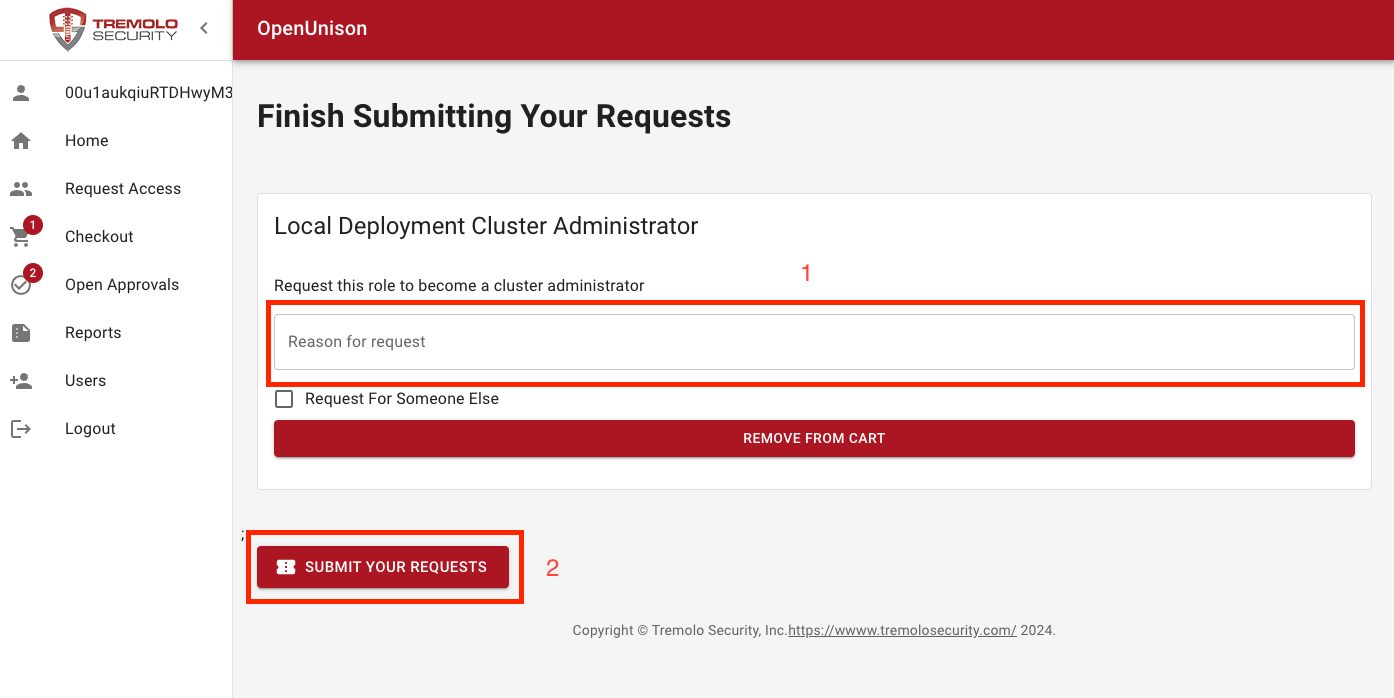
- Provide a reason for why the access to administrator is needed.
- Click Submit Request to complete the request.
A current administrator will need to approve this request. You can see who is able to approve the request by Viewing Reports, namely the My Open Requests report.
Requesting a New Namespace
Any user can request to create a new namespace. Once requested, It's up to the OpenUnison administrators to approve the request. In order to request a new namespace, first login to the NaaS portal.
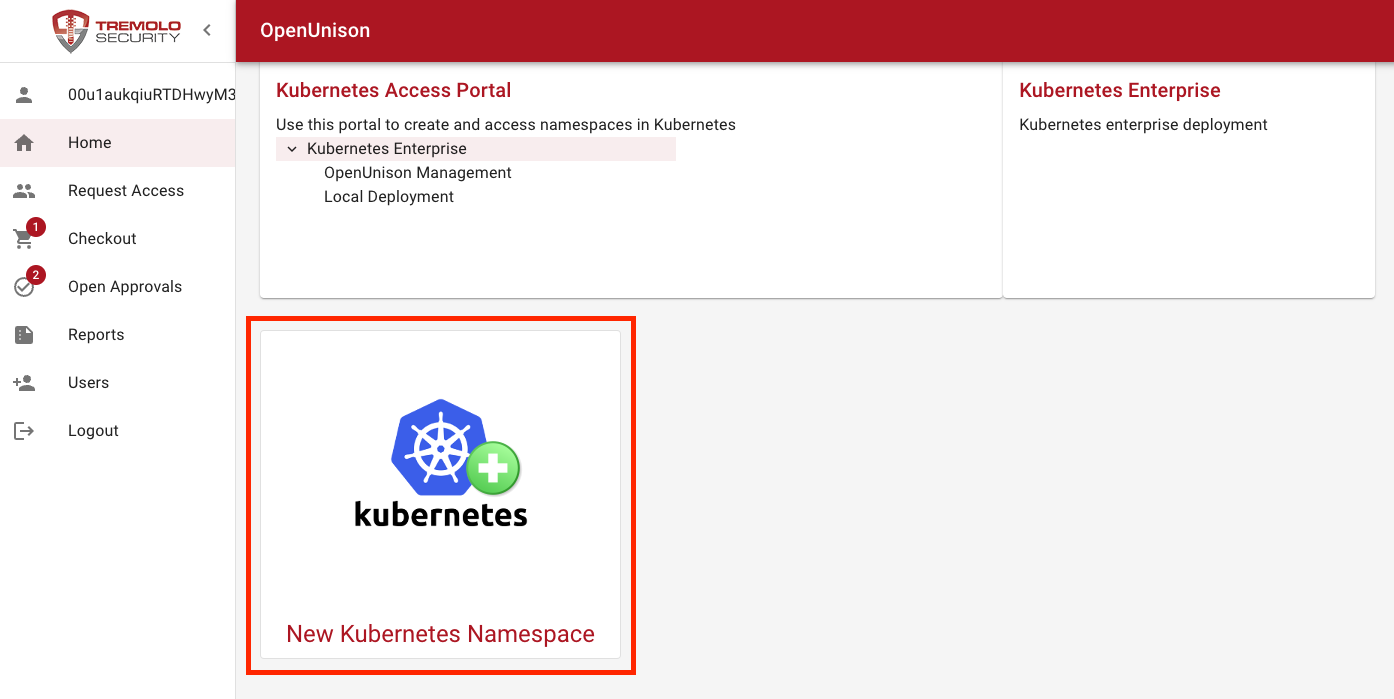
Click on the New Kubernetes Namespace badge. The next screen will depend on which management model you choose.
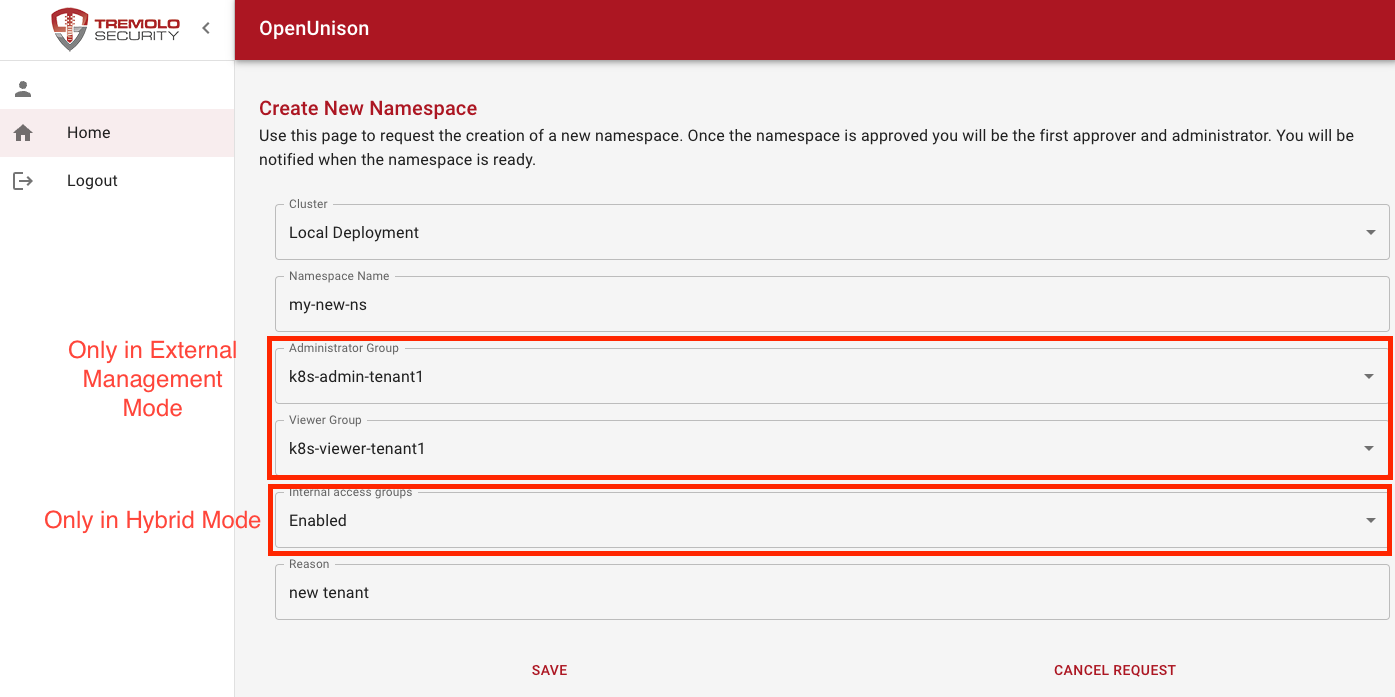
| Field | Description | Mode |
|---|---|---|
| Cluster | The cluster where you want to create the new namespace | Internal, External, Hybrid |
| Namespace Name | A unique name, must comply with Kubernetes naming standards | Internal, External, Hybrid |
| Administrator Group | If External or Hybrid mode is enabled, the name of the group from the identity provider that will have the admin role for this namespace |
External, Hybrid |
| Viwer Group | If External or Hybrid mode is enabled, the name of the group from the identity provider that will have the view role for this namespace |
External, Hybrid |
| Internal Access Groups | In Hybrid mode, determins if the tremolo.io/request-access: enabled label should be placed on the namespace to allow users to request access. |
Hybrid |
| Reason | Why the namespace needs to be created | Internal, External, Hybrid |
If using external or hybrid mode and your remote identity provider is supported (currently Okta and Active Directory), you'll be able to choose your groups. Otherwise you'll need to know the name of the group ahead of time and enter it in the text box.
Once you click Submit Request, a current administrator will need to approve this request. You can see who is able to approve the request by Viewing Reports, namely the My Open Requests report. Once approved and your namespace has been created, you'll be notified via an email. After that, users can login to request access to your namespace or you can add them to your groups in the identity provider so they can start working in their namespaces.
Requesting Access to a Namespace
In Hybrid or an Internal management modes, users can login to request access to any namespace with the tremolo.io/request-access: enabled label. First, login to the NaaS portal and:
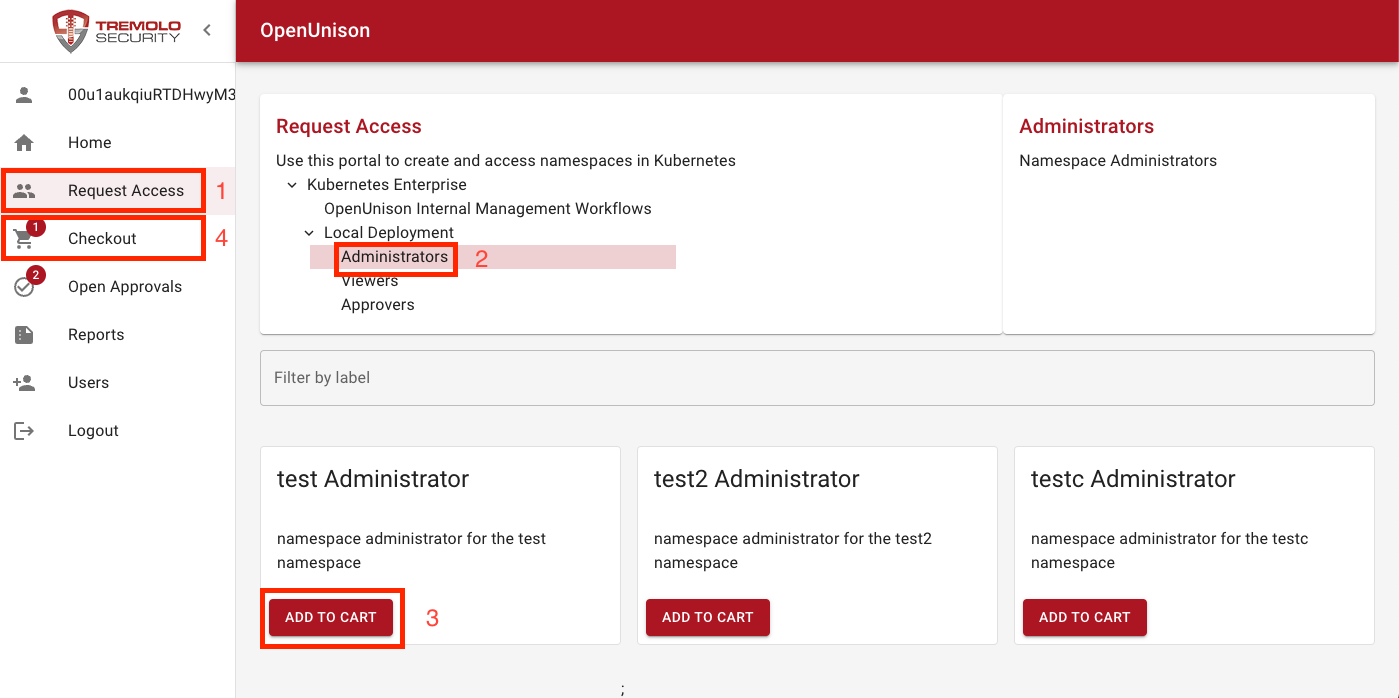
- Click on Request Access in the menu bar
- For your cluster, click on the arrow next to it to show the available options
- Choose eithert Administrators or Viewers depending on what's being requested
- Next to the namespace you want access to, click on Add To Cart
- In the menu bar, click on Check Out to complete your request
On the checkout screen:
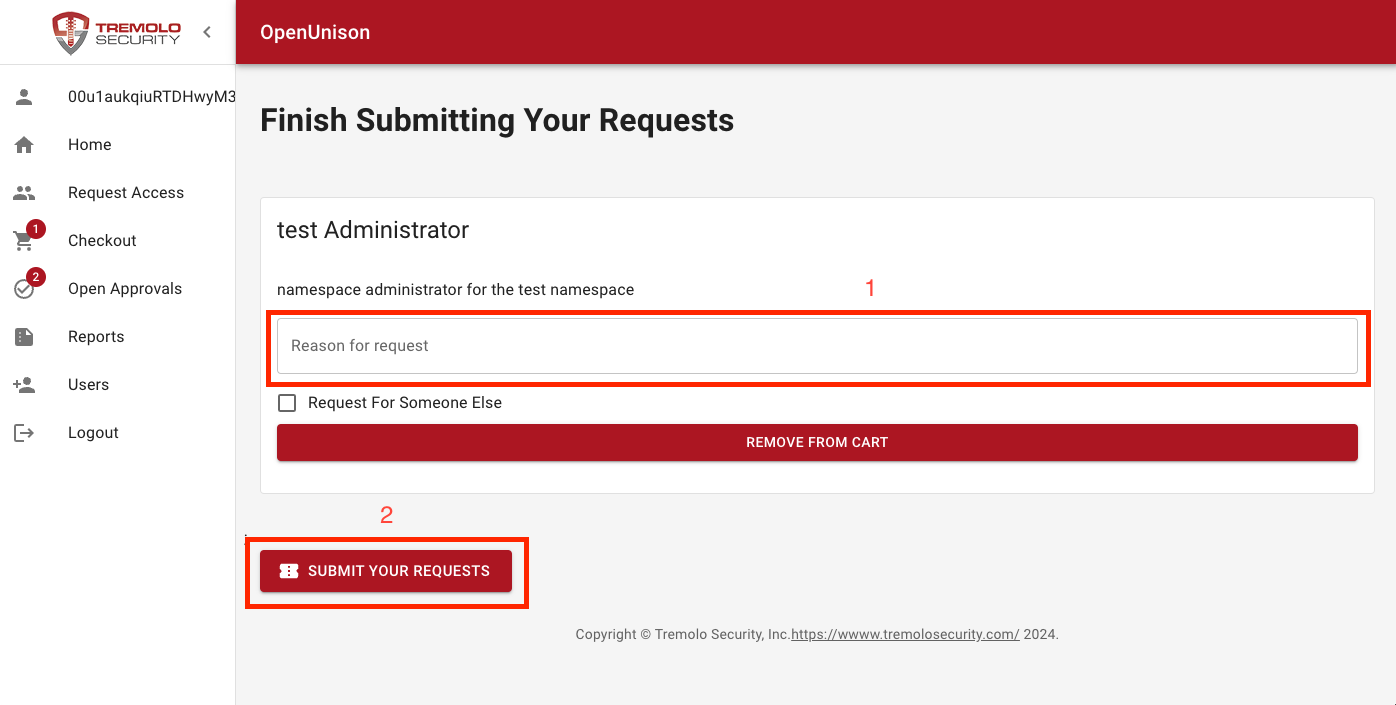
- Provide a reason for why the access to administrator is needed.
- Click Submit Request to complete the request.
A namespace owner will need to approve this request. You can see who is able to approve the request by Viewing Reports, namely the My Open Requests report.
You'll receive an email once your access is approved. On your next login, you'll be able to access the approved namespace as part of your request.
Access Approvals
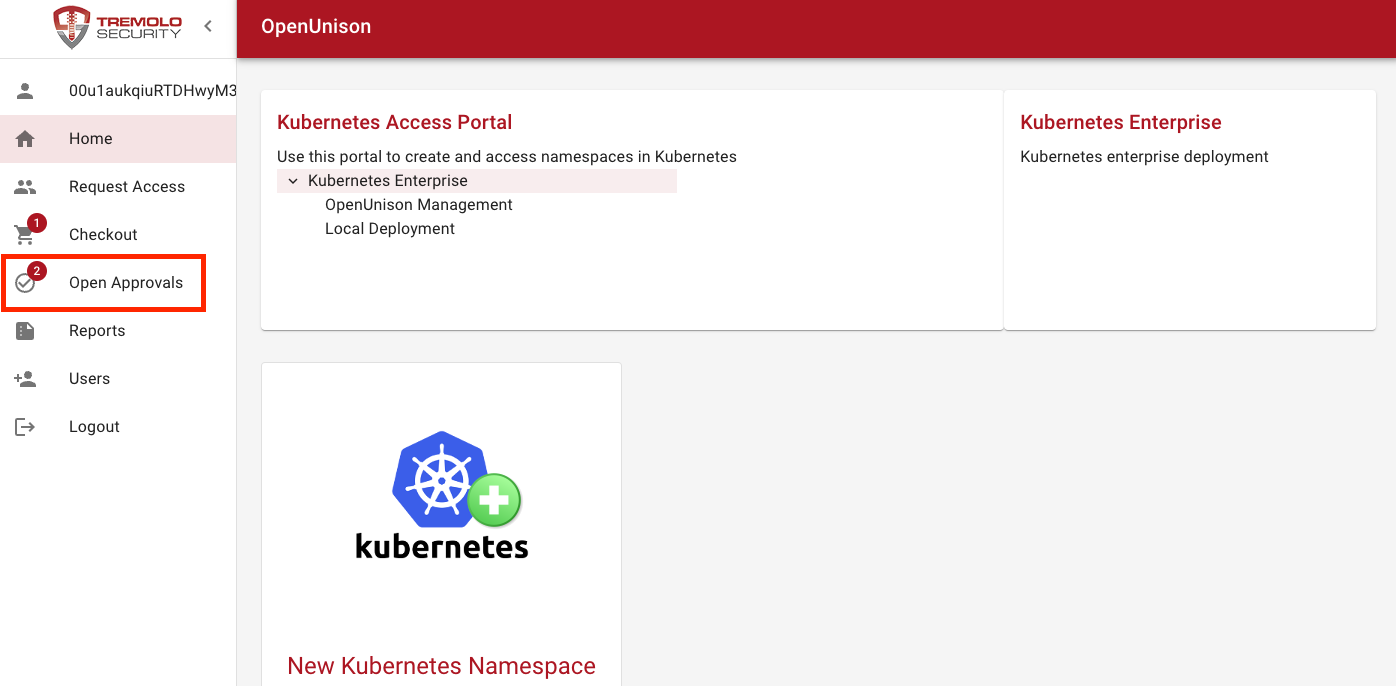
Once a request is made, approvers will receive email notifications that there is an open request. Requests are approved in the NaaS portal. When you have an open request and login to the portal, there will be a small red number next to Open Approvals in the menu bar, as seen below:
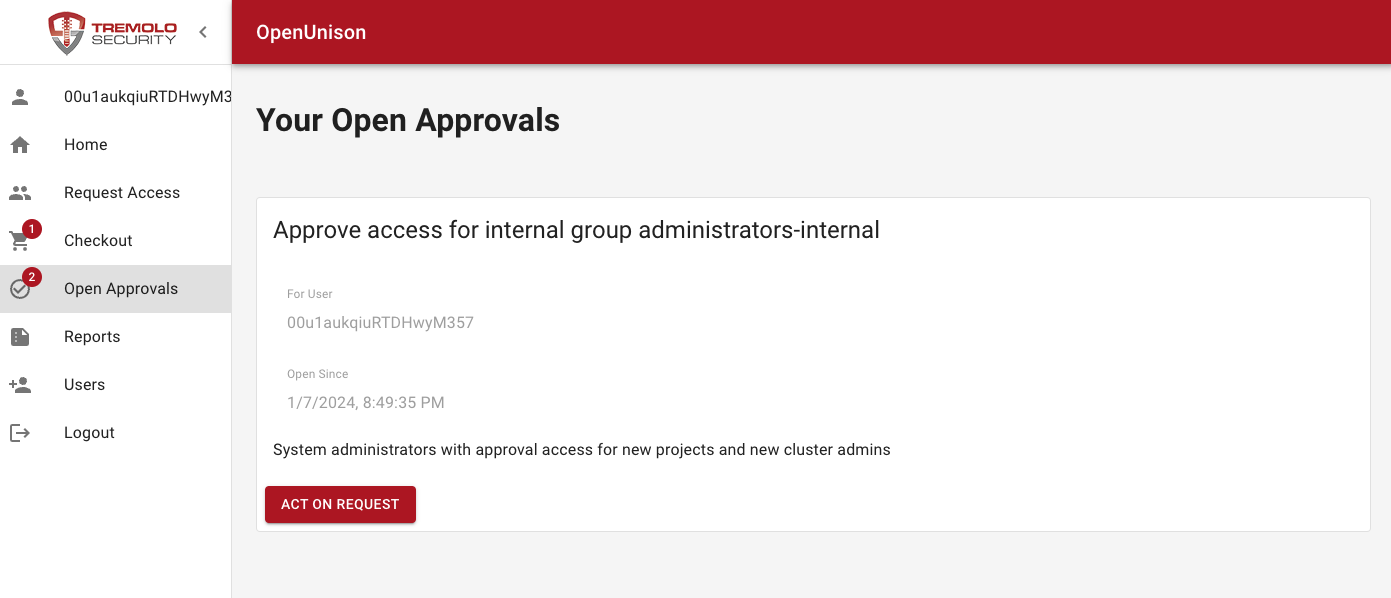
Click on Open Approvals and the list of approvals that are assigned to you are shown:
Click on Act On Request on an approval, and the review screen will appear:
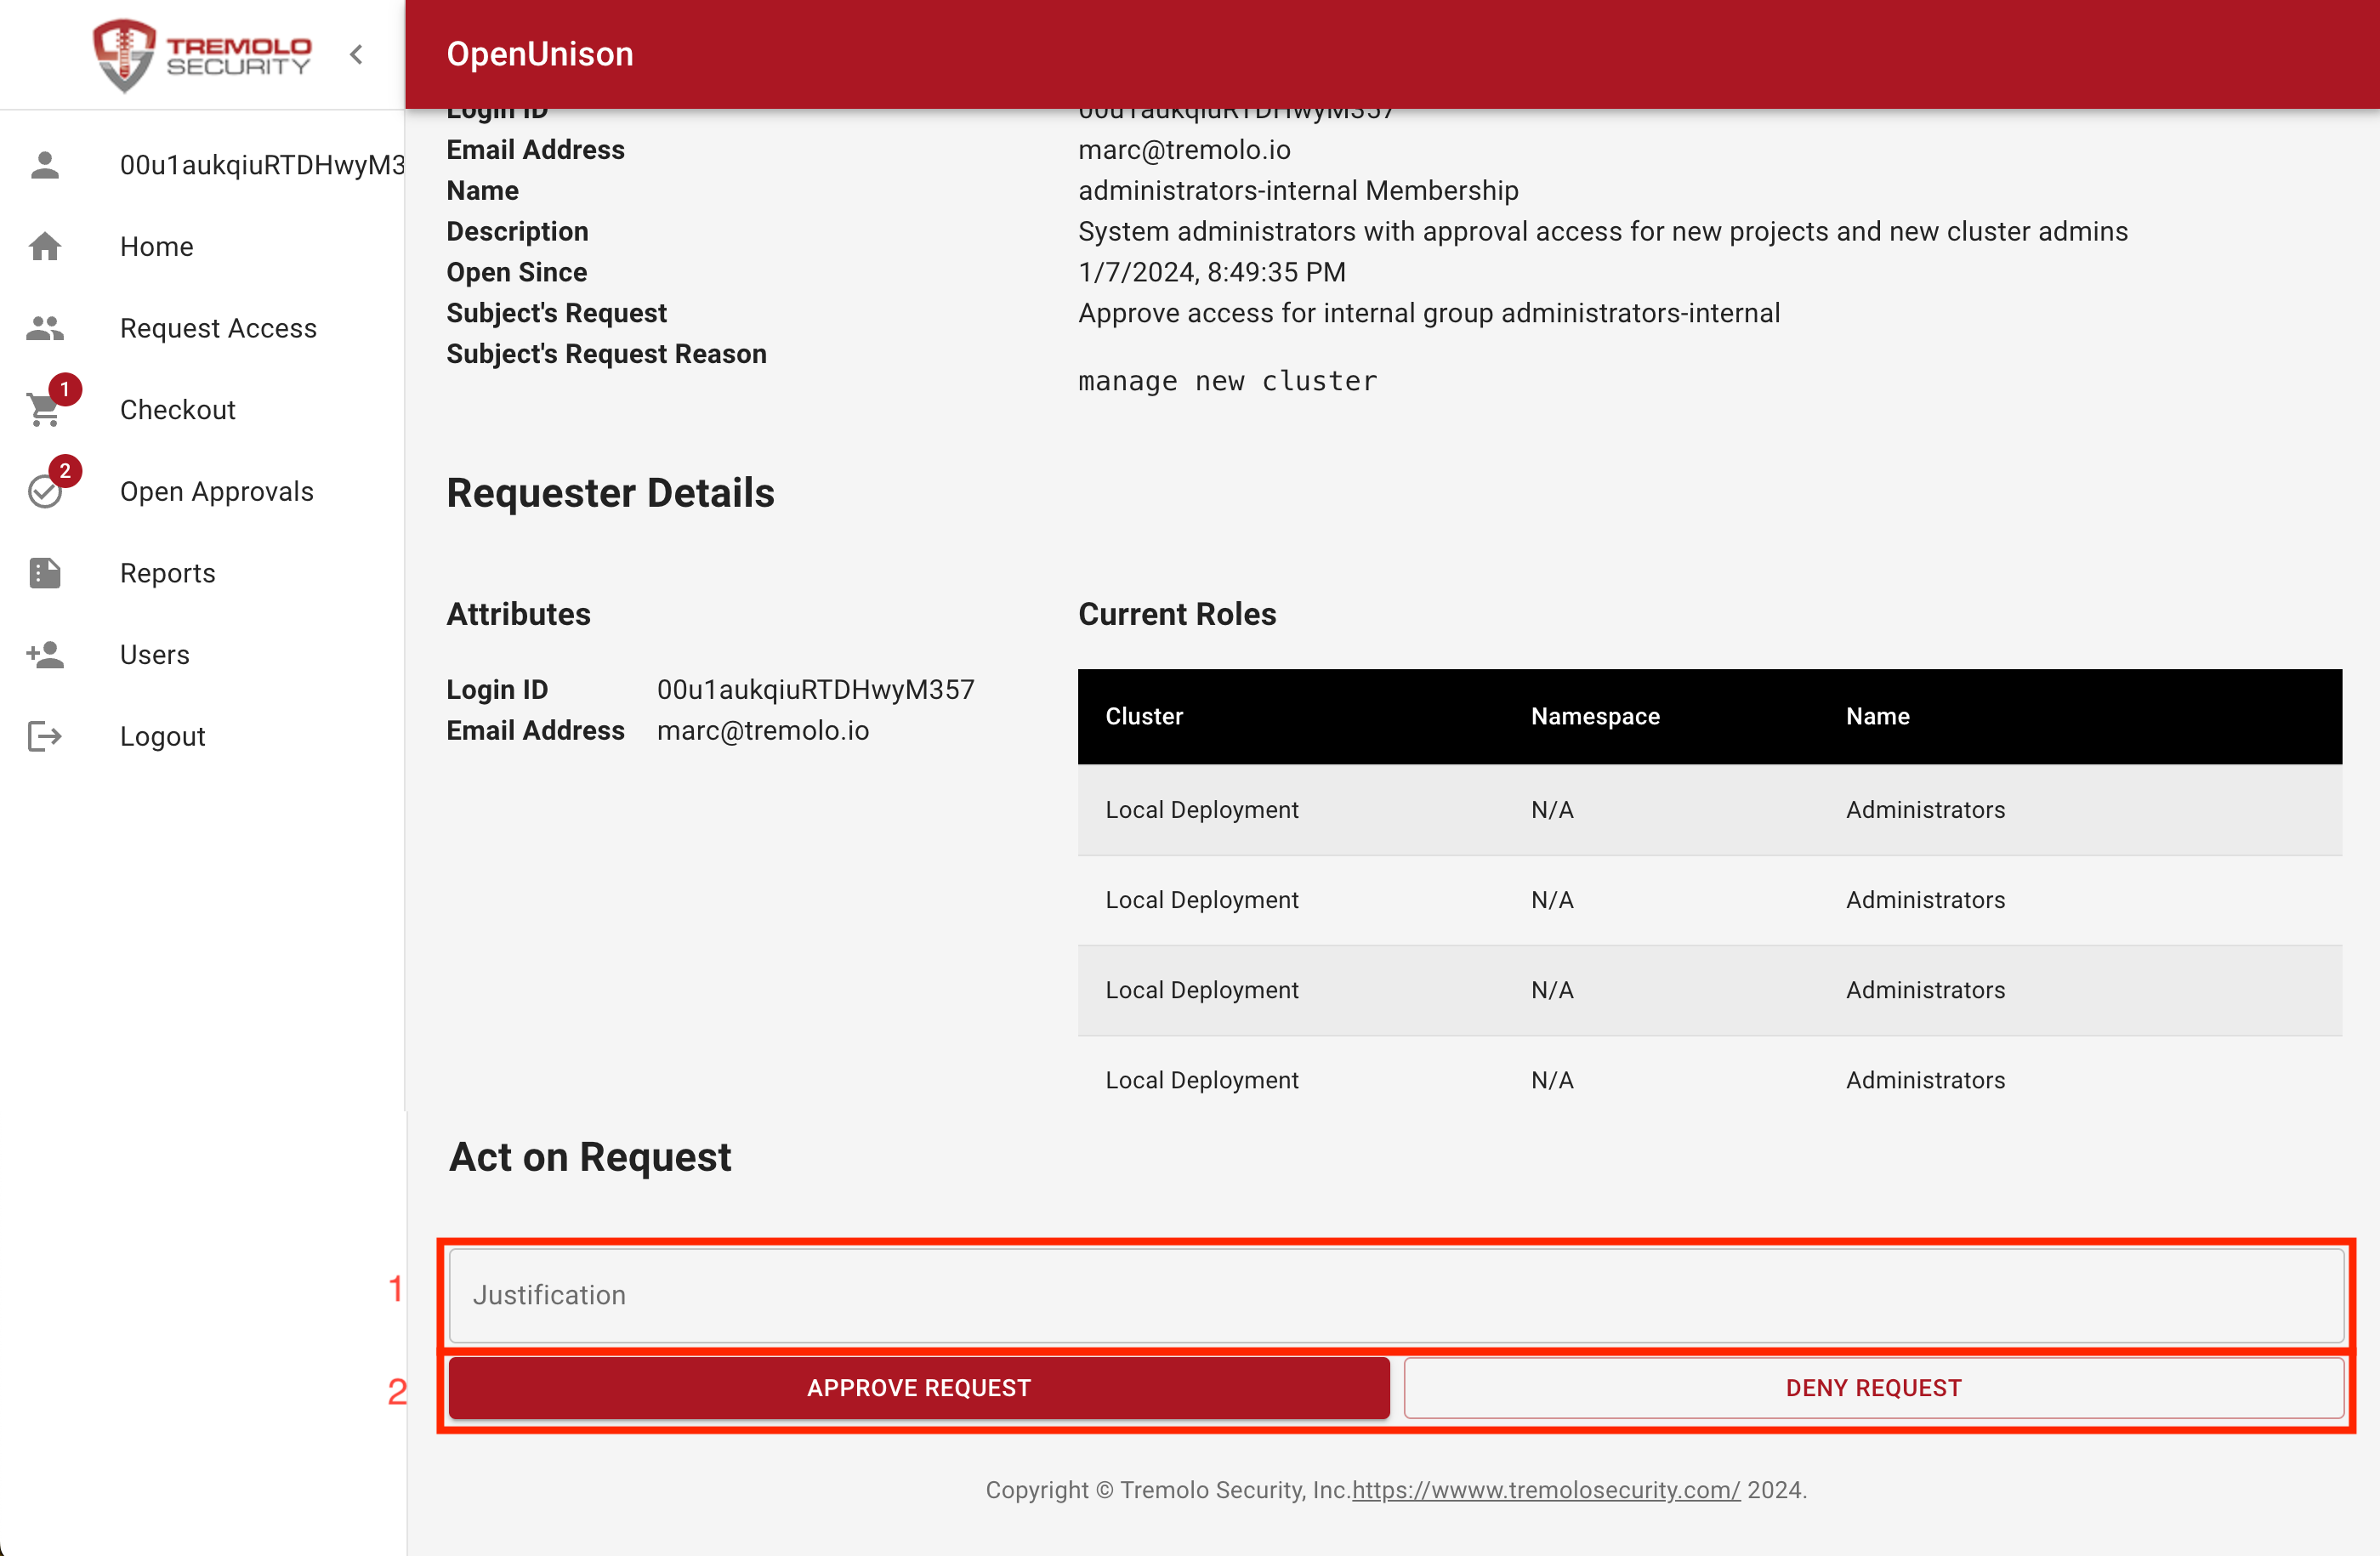
This screen provides information about the request and the current state of the user making the request:
- Provide your justification for approving or denying the request
- Choose either approving or denying the request. If you choose to deny the request, and the user already has access to groups in question, their access will be removed.
Once you choose to approve or deny the requst, the next screen is similar but for confirmation. There's nothing to edit. You can either confirm your choices or go back.
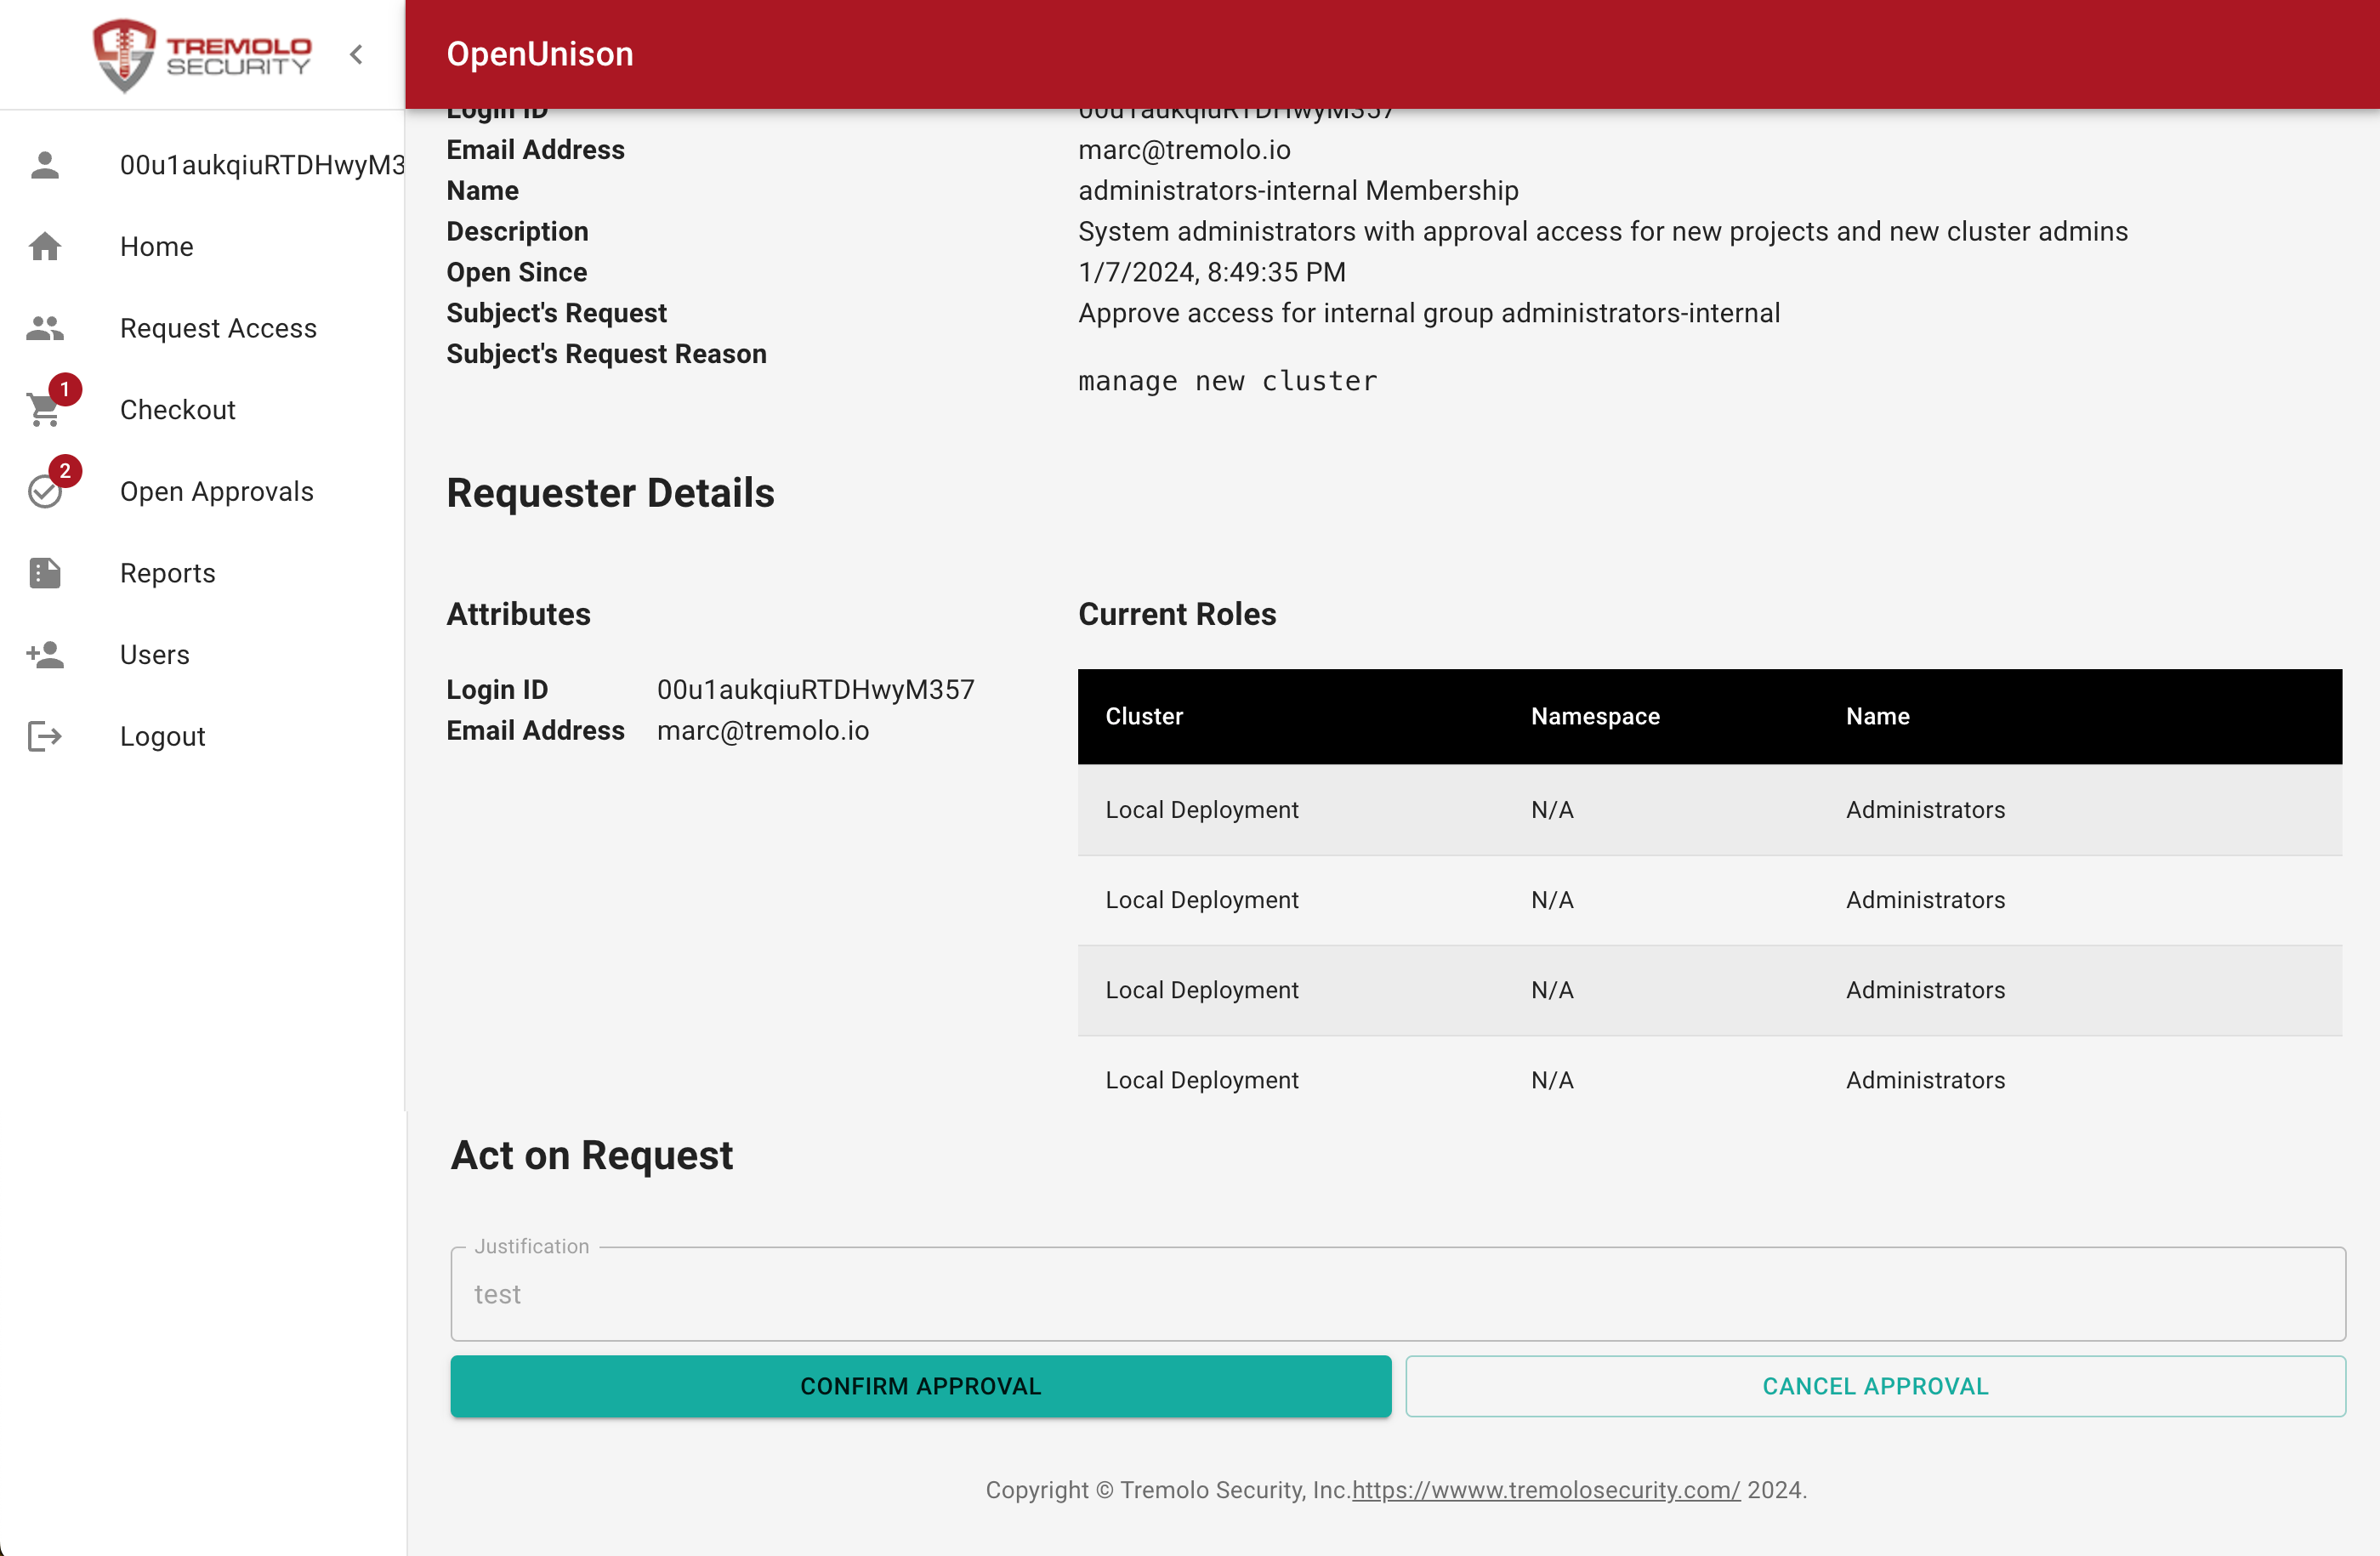
This step will:
Depending on your apprval status:
- If approved - Notify the user of your decision and let them know they can begin using the resource they requested
- If denied - Notify the user why the request was denied
Finally, any other user that could be responsible for this approval will have it removed from their list of open approvals.
Reports
OpenUnison has several reports that you can use to find the status of open requests, view who approved requests, and track which users have accessed your clusters. Clicking on the Reports link in the upper right hand corner of the menu bar will load the reports. Below are the reports that come pre-built with the NaaS portal:
| Report | Description | Accessible By |
|---|---|---|
| My Open Requests | Lists all open requests and who can approve them. | Everyone |
| Approvals Completed By Me | Lists all approvals completed by the logged in user | Everyone |
| Open Approvals | List of all open requests and who can approve them | OpenUnison Administrators |
| Completed Approvals | List of all approvals between a set of dates and who completed the approval | OpenUnison Administrators |
| Single User Change Log | List of all attributes and objects that have been created that are associated with the user provided when running the report | OpenUnison Administrators |
| Change Log for Period | List of all attributes and objects that have been created or changed between the two dates provided | OpenUnison Administrators |
| Dormant Users | List of users that haven't logged in for 30 days | OpenUnison Administrators |
End Sessions
Requires OpenUnison 1.0.43+
Administrators and security operators can automatically clear a user's sessions across all integrated clusters by running the End sessions workflow for a user. This workflow will delete all oidc-session objects across all clusters for the user, and create an EndSession object to force immediate logout from existing web sessions. This will end all user's access once their id_token expires (usually within a minute or two depending on clock skew) and force user logged into dashboards to re-authenticate.
The first step is to login to the OpenUnison portal, then:
- Click on Users to search for the user you want to force logout for
- Search for the user based on their login id, or any other attributes available for searching
- Once you locate the user you want to logout, click Add to cart

Once the user(s) you want to clear out have been added to the local cart:
- Click on the OpenUnison Security Operations organization
- Choose the End sessions workflow and specify a reason for end the user's sessions
- Click Submit your requests

Delegating to a Security Team
In large organizations, the security team may want to be directly responsible for ending user sessions. For internal group based NaaS portals, create the database group security-internal and add your security team to it. For external groups enabled NaaS portals, create a GroupMetaData object to map to the security-external group: